🏆 Tournament Manager Guide
Step-by-step walkthrough for setting up and running a multi-division pool tournament with parallel brackets and playoffs. The guide is organized into two work periods: Before Game Day — create brackets, register players, and form teams — and On Game Day — confirm attendance, balance brackets, run pools, and run playoffs. Check off each phase as you complete it.
Navigation Basics — Start Here
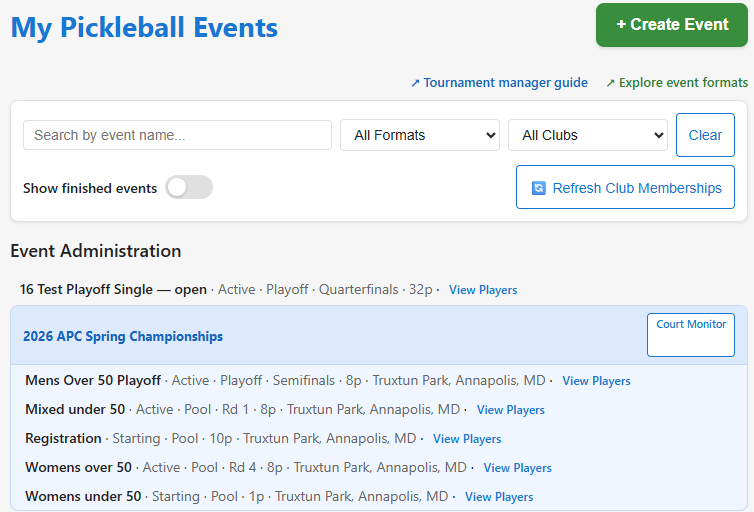
Events Page — your tournament dashboard
Go to My Events. At the top is a sticky Search by event name filter bar. Type your tournament name and all brackets for that tournament appear grouped together — Men, Women, Mixed A, Mixed B, playoffs — all in one view.
The filter is sticky: it stays set as you scroll or return to the page, so you always see just your tournament's brackets.
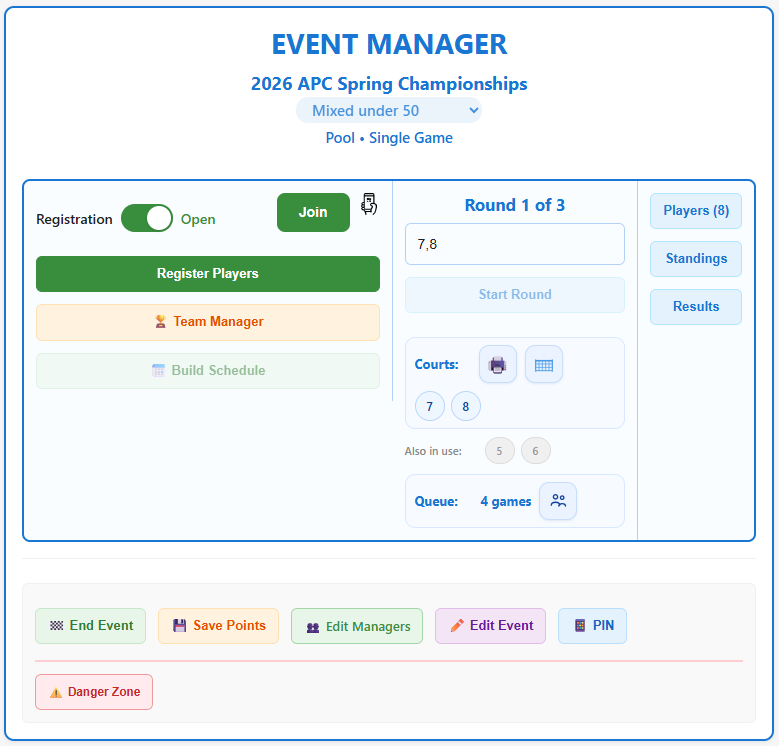
Event Page — the hub for everything
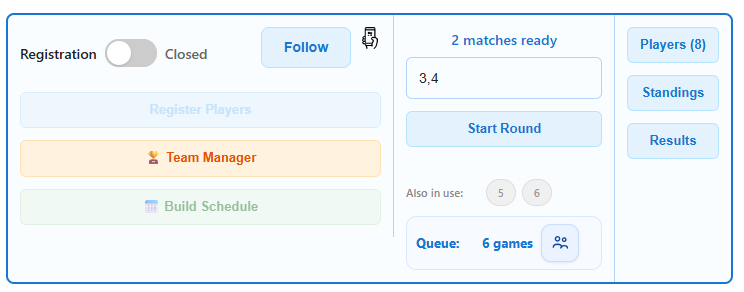
Every tool you need to run a bracket lives on its Event Manager page. You spend almost all your time here. It has three panels side by side:
- Registration toggle Open/Closed
- Register Players
- 🏆 Team Manager
- 📅 Build Schedule / 🏁 Build Bracket
- Court number input
- Start Round / Assign Courts
- Court pills → Court Release
- Round indicator
- Players
- Standings
- Results
- 🪙 Flip Coin (on tie)
Below the three panels: admin actions are always visible to managers — End Event · Save Points · Edit Managers · Edit Event · PIN.
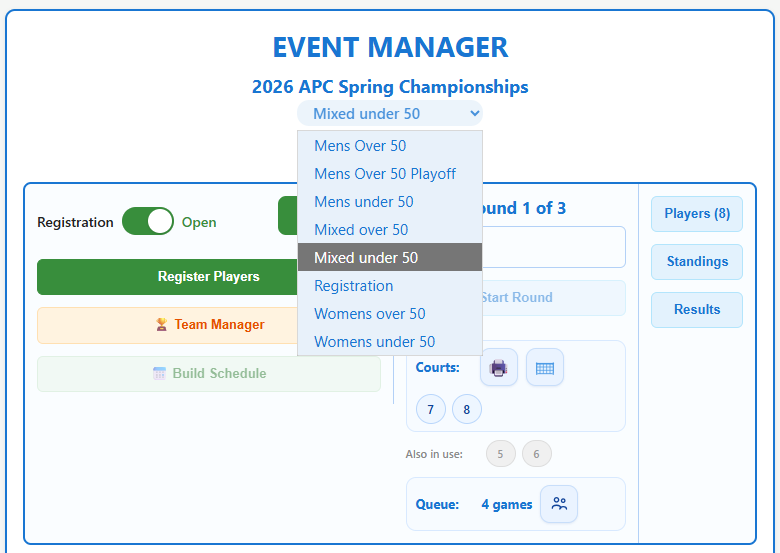
Bracket Switcher — jump between brackets instantly
At the top of every Event page, the current bracket name is displayed as a blue dropdown selector. Click it to see all other brackets in the same tournament and jump directly to any one — no need to go back to the Events page.
Use this constantly during a live tournament to check other brackets, monitor round progress, or jump in to help a co-manager.
Pre-Tournament Setup
Create a Pool Event for each division
Go to Create Event and fill in the following for each division:
- Event Name — the tournament name, identical for every bracket (e.g. Spring Classic 2026)
- Bracket/Division — the division name (e.g. Men, Women, Mixed A)
- Location — the venue where this bracket is played. Used by the also in use court list to scope conflict detection — only courts at the same location are checked. If your tournament spans multiple venues, set this accurately to avoid false court collision warnings.
- Join PIN — a 4-digit PIN players use to self-register
- Event Type → Pool
Assign Co-Managers
If different staff members will manage different brackets simultaneously, open each bracket's Event page and grant access:
Player Registration
Open Register Players from the Event page
On the bracket's Event page, Registration panel: click Register Players. The player registration page opens pre-loaded for this bracket.
The Register Players page has two ways to add players:
Option A — Select PickleRounds users: A searchable list of registered app users appears. Filter by name, check the players you want, then click Add Selected Users. (For DUPR-linked events this list is filtered to club members only.)
Option B — Paste from Excel: Up to four columns: Name, Rating, optional Rank, optional DuprId. Tab, comma, or multiple spaces all work as delimiters:
Player self-registration (optional)
Players can scan the QR code shown in the Registration panel and enter the Join PIN to register themselves. Useful for walk-ins.
Team Formation
Open Team Manager from the Event page
On the bracket's Event page, Registration panel: click 🏆 Team Manager. Unaffiliated players appear in the left sidebar; the main area shows existing teams.
Create teams (2 players each)
Repeat until all players are assigned to teams.
Split a large division into two pools (optional)
To move teams from one bracket to another (e.g. Mixed → Mixed A and Mixed B):
- On the team card, click ↗ Move.
- In the Transfer modal, search for the destination bracket, select it → Confirm.
- Wait for the confirmation before moving the next team.
Then rename the original bracket: Event page → ✏️ Edit Event → update Bracket field → save.
Running Pool Brackets
Close Registration
Registration panel: click the Registration toggle switch. Status changes from Open to Closed, which unlocks Build Schedule.
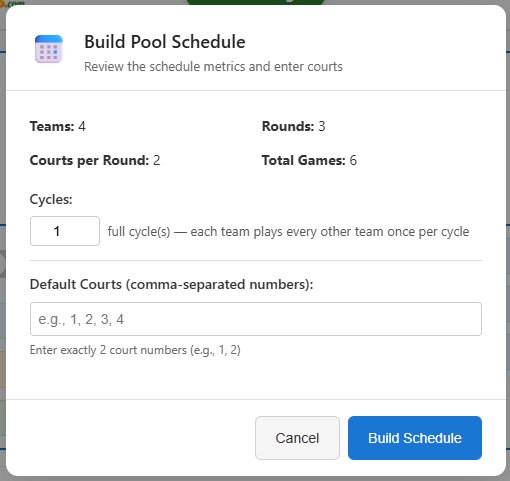
Build the Pool Schedule
Registration panel: click 📅 Build Schedule. Enter court numbers and confirm — the system generates a round-robin schedule for all teams.
Start a Round
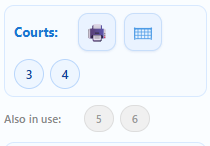
Courts & Rounds panel: enter court numbers, then click Start Round. Courts activate and court pills (numbered badges) appear — one per active court.
Print Court Tickets
Immediately after starting a round, click on the Printer icon to print court assignment tickets for all matches in the round.
Each ticket shows: court number · team names · player names · score boxes · a QR code that both players and managers can scan. Players use it to self-report scores; managers can scan it to jump directly to the exact Court Release page for that match — useful when managing multiple brackets to ensure scores are entered into the correct match.
In the Courts & Rounds panel, the printer icon (🖨) next to each court pill opens the print page directly. Courts shared with another bracket show an also in use warning.
Enter Match Results — Court Release
When players return tickets, click the court pill in the Courts & Rounds panel to open Court Release for that court.
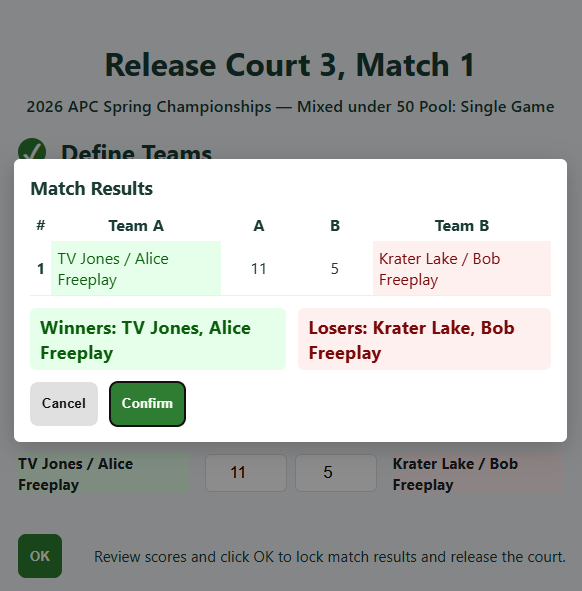
Release frees the court, records the result, and returns you to the Event page. The pill disappears from the panel.
Monitor Courts Across All Brackets
Open Tournament Courts on a separate tablet or screen. It shows every active court across all brackets, auto-refreshing every 10 seconds. An ⚠ orange conflict banner appears if the same court number is active in two brackets simultaneously.
Advance Through All Rounds
After all court pills are cleared, click Start Round for the next round. Repeat steps 3–5. After the final round is fully released, the event automatically becomes Finished and standings are computed.
Resolve Tie-Breakers
Results panel: if teams are tied, a 🪙 Flip Coin button appears. Click it to break the tie randomly.
Creating Playoff Brackets
Create a Playoff Event
Go to Create Event. Use the same tournament name as the pool brackets so this playoff appears in the same group. Set Event Type → Playoff. Give it a Bracket name (e.g. Battle of the Sexes).
After creating, open My Events and confirm it appears in the tournament group. Click it to open its Event page.
Import Pool Results — Team Manager
On the playoff Event page, Registration panel: click 🏆 Team Manager → then Import Pools.
Step 1 — Select source pools: All pool brackets in the tournament are listed. Deselect all via the Select All toggle, then check only the pools that feed this playoff. Set a short Prefix per pool (e.g. M, W) so teams read M-1, W-2.
Step 2 — Set cutoff: Enter the number of top teams to import per pool (e.g. 2 → top 2 per pool).
| Teams imported | Bracket shape |
|---|---|
| 4 | Semifinal 1, Semifinal 2, Final, 3rd Place |
| 8 | Quarterfinals, Semis, Final, 3rd Place |
Close Registration & Build Bracket
Back on the playoff Event page:
The page reloads with the bracket schedule built and Start Tournament becomes active in the Courts & Rounds panel.
Running the Playoffs
Assign Courts and Start Round 1
Courts & Rounds panel: enter court numbers → click Start Tournament. Courts are assigned to first-round matches. Court pills appear for each active court.
Print Court Tickets
Same as pool play (Phase 4, Step 4). Playoff tickets show the match name (Semifinal 1, Final) instead of a round number.
Enter Playoff Scores via Court Pills
Courts & Rounds panel: click a court pill → Court Release → enter scores → OK → Confirm → Release. The bracket automatically advances winners to the next round.
Assign Courts for Subsequent Rounds
After all courts are released for a round, back on the Event page enter courts and click Assign Courts. Court pills appear for the next round (Final + 3rd Place). Repeat until the Final is played.